Reverse Engineering the iOS Boot Mechanism: Part 1
Due to some unforeseen medical issues, my time as an elite athlete adbruptly came to an end a couple months ago and while dealing with those issues I had a lot of free time on my hands. So, naturally I finally got around to reading Mac OS X Internals: A Systems Approach by Amit Singh and Mac OS X and iOS Internals: To the Apple’s Core by Johnathan Levin in their entirety. Both are excellent books and highly recommended. Between reading those books, my general curiousity in low-level computer concepts, and an even greater curiousity in mobile computing I decided it was time to take a crack at reverse engineering the iOS boot mechnisms.
Components of the Boot Mechanism
iOS Boot Components
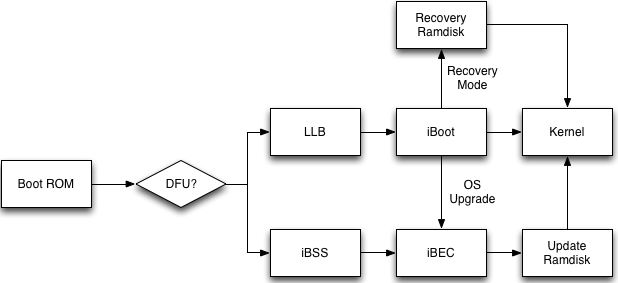
Before diving into setting up for decrypting and dissasembling the various components let’s first take a quick look at an overview of the boot sequence.
It all starts in the Boot ROM. This bit of code is flashed onto the device during chip fabrication and can’t be updated. It contains the Apple Root CA certificate and is responsible for checking the integrity of the second stage bootloader, Low-Level Bootloader (LLB). The Boot ROM performs some initialization tasks and will either proceed to load LLB or move towards DFU mode through iBSS and iBEC. LLB and the third stage bootloader, iBoot, are tasked with the job of initializing the remaining hardware components and eventually loading the kernel. Both LLB and iBoot are stored on the filesystem meaning that they can be updated through an iOS upgrade. We’ll see more of the specifics in future blog posts as I work through the various components.
Getting The Pieces
Before we can begin, we need to gather a few pieces and establish a consistent work environment. To follow along you will need:
- Mac OS X >= 10.8 (Mountain Lion)
- iOS 7.0.4 IPSW (iOS: 7.0.4, Build: 11B554a, Device: iPhone3,1)
- img3decrypt.rb
- IDA Pro
In theory you can use any version of iOS, the reason for iOS 7.0.4 is that I have an iPhone 4 running that and eventually plan on translating some of this reversing into fun tricks on the device. If you don’t have a license for IDA Pro then you can accomplish everything using the Hopper Disassember.
You can find links to all recently released iOS images along with the corresping key/IV pairs on the fabulous http://www.icj.me/. The image and key/IV pairs we’re interested in can be found at http://www.icj.me/ios/keys/iPhone3,1/11B554a.
The next piece you’ll want to grab is the img3decrypt.rb script created by pod2g. To use img3decrypt.rb you’ll also need Ruby installed.
Unpacking the IPSW
Before we unpack the IPSW it’s important to keep your workspace organized. I like to use a folder structure such as the following:
~/Reversing/iOS/7.0.4/iPhone3,1/decrypted/
~/Reversing/iOS/7.0.4/iPhone3,1/ipsw/
~/Reversing/iOS/7.0.4/iPhone3,1/unpacked/
Next up, we need to unpack the iOS image (IPSW). This is pretty easy since an .ipsw is actually just a ZIP-file in disguise. Go ahead and tack a .zip onto the image name and then unzip it.
[dean@zippy iPhone3,1]$ cd ipsw/
[dean@zippy ipsw]$ mv iPhone3,1_7.0.4_11B554a_Restore.ipsw iPhone3,1_7.0.4_11B554a_Restore.ipsw.zip
[dean@zippy ipsw]$ unzip iPhone3,1_7.0.4_11B554a_Restore.ipsw.zip -d ../unpacked/
Archive:  iPhone3,1_7.0.4_11B554a_Restore.ipsw.zip
  inflating: ../unpacked/058-1056-002.dmg
  inflating: ../unpacked/058-1086-002.dmg
  inflating: ../unpacked/058-1139-002.dmg

  ... snip ...

   creating: ../unpacked/Firmware/usr/
   creating: ../unpacked/Firmware/usr/local/
   creating: ../unpacked/Firmware/usr/local/standalone/
  inflating: ../unpacked/kernelcache.release.n90
  inflating: ../unpacked/Restore.plist
[dean@zippy ipsw]$
At this point you should have an unpacked copy of the iOS image in your unpacked directory.
Decrypting LLB
Once we’ve unpacked the iOS image the next thing we need to do is decrypt the LLB binary. Like most files in the iOS image, the LLB binary is contained inside an IMG3 file with the data section encrypted using a key that the iOS device derives during the upgrade process. Therefore, in order to get at the data we first need the key and associated initialization vector (IV) for the LLB binary. Note that the key/IV pair is different for each file in the iOS image as well as for each device and build version combination.
Now, let’s get started. The first thing we’ll want to do is grab the key and IV from http://www.icj.me/ios/keys/iPhone3,1/11B554a. I’ve also copied the key/IV pair below to simplify things.
Key: e3b72ddcdc89edf6f29258c7a0e65cba0d808d1a965892515bfff988e3fd5906
IV:  3eb5aa8acbe1386dc13e2673a2546128
Once we have that, open up your terminal and move to the directory where the LLB binary is. Once you’re there, just run img3decrypt.rb and it should report that the decryption succeeded and it created a .dec file. The .dec contains the decrypted version of LLB.
[dean@zippy ~]$ cd ~/Reversing/iOS/7.0.4/iPhone3,1/unpacked/Firmware/all_flash/all_flash.n90ap.production/
[dean@zippy all_flash.n90ap.production]$ img3decrypt.rb LLB.n90ap.RELEASE.img3 \
> e3b72ddcdc89edf6f29258c7a0e65cba0d808d1a965892515bfff988e3fd5906 \
> 3eb5aa8acbe1386dc13e2673a2546128
Image decrypted OK (bootload)
Writing DATA payload to LLB.n90ap.RELEASE.img3.dec
[dean@zippy all_flash.n90ap.production]$
I like to keep things organized, so I then moved the decrypted version into our decrypted folder.
[dean@zippy all_flash.n90ap.production]$ mv LLB.n90ap.RELEASE.img3.dec ../../../../decrypted/
[dean@zippy all_flash.n90ap.production]$ cd ../../../../decrypted/
[dean@zippy decrypted]$ ls -1
LLB.n90ap.RELEASE.img3.dec
[dean@zippy decrypted]$
Thanks to the awesome work of the iOS jailbreak scene that’s really all there is to decrypting files in the iOS image.
Setting Up In IDA
This will be the last part covered today. What we want to do is set things up in IDA so that the addresses are correct and you can then explore on your own. In my next article I’ll go into more detail about how the binary is laid out and how I actually went about understanding the LLB image at a high-level.
First thing’s first, let’s open up IDA and load our decrypted image. To do that, find IDA Pro in your Applications folder then once it’s running go to File -> Open.
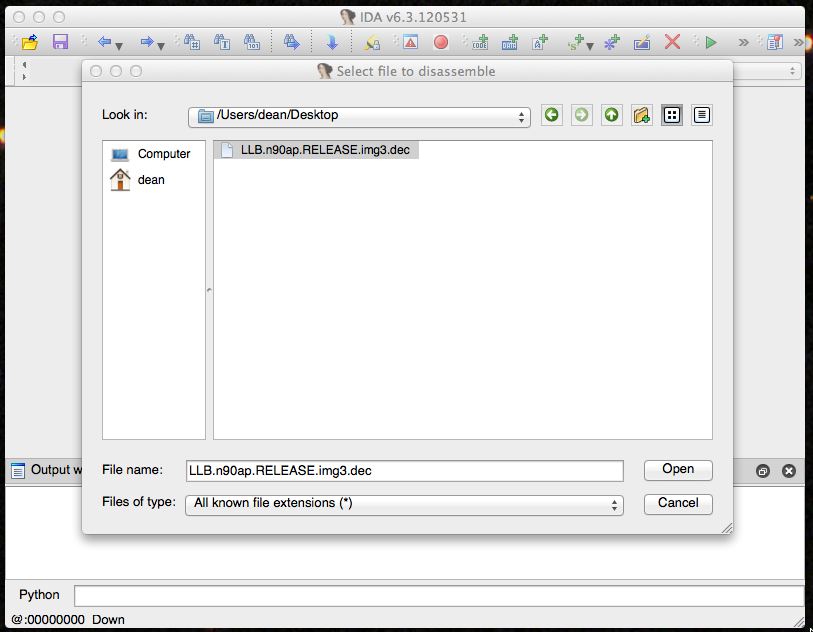
IDA open file dialog
You’ll then be prompted with the “Load a new file” screen. Here you’ll want to change your processor type from the default Intel selection to ARM.

IDA New File dialog
Next you’ll be prompted to make any desired changes to the memory organization. Just click OK for the default choices.
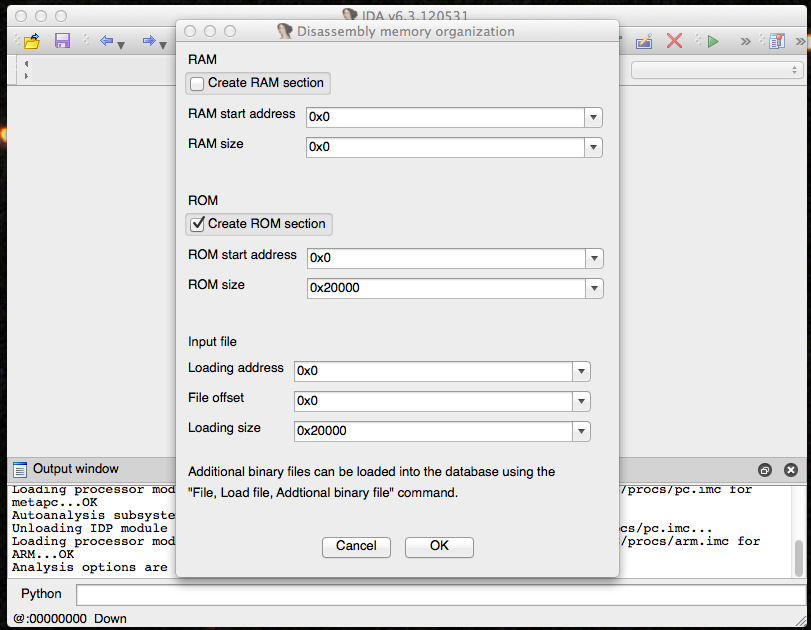
IDA Memory Organization
At this point IDA should warn you that since you’re loading a raw binary it has no idea how to parse the file. Because of that, you’ll have to instruct IDA where the entry point is.
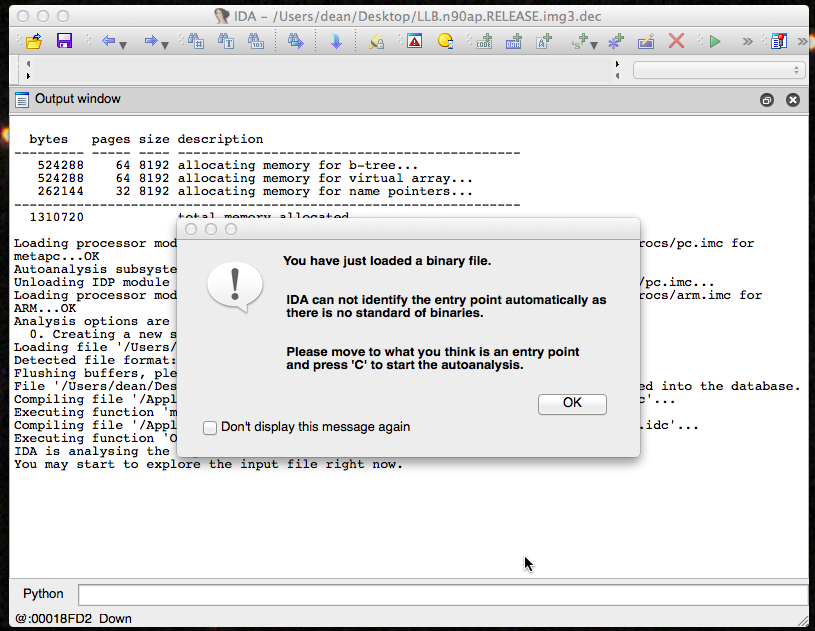
IDA Warning
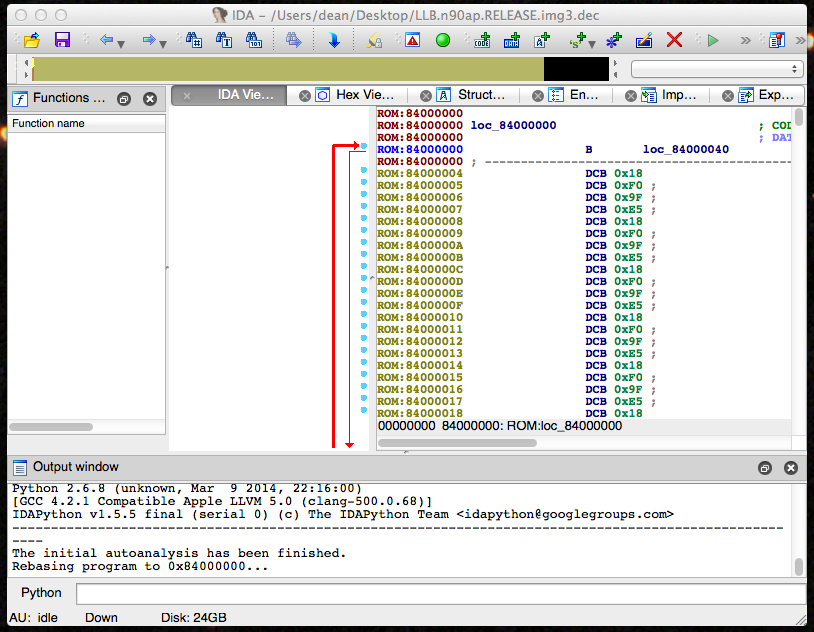
Now our file is loaded, but the addresses are wrong. The Boot ROM on an iOS Device loads LLB beginning at the address 0x84000000 so we need to tell IDA that. You can do this by going to Edit -> Segments -> Rebase Program… and entering 0x84000000 into the field.

IDA Rebase Program
Finally, we now have LLB loaded with the correct addresses. All we need to do now is tell IDA where the entry point is and let it do as much of its auto-analysis as possible. In my next article I’ll explain why this is true, but for now just place the IDA cursor on the byte at 0x84000000 and mark it as code (hit the C key). If all goes well IDA should recognize that as a branch instruction.
First instruction marked as code
At this point, you should be able to start exploring and begin to reverse engineer LLB. As an experiment try to find all the strings in the binary and see if you can identify the general layout of the binary.
Next time I’ll go through the organization of the binary and how I figured it out. Until then, happy hacking!